My Calendar

2014年7月26日 星期六

Android-建立選單(Menu)

Android-建立選單(Menu)

建立選單有兩種方法:
  1. 透過XML定義選單
  2. 透過程式碼定義選單

不管是第一種或第二種方法都要用onCreateOptionMenu建立選單。

透過XML定義選單

選單的xml描述檔在 res -> menu 當中,本篇的選單xml檔案名稱為main.xml(任何名稱都可以)在xml檔案裡定義我們想要的選單內容。以下是一個範例。

main.xml
<menu xmlns:android="http://schemas.android.com/apk/res/android"
    xmlns:app="http://schemas.android.com/apk/res-auto"
    xmlns:tools="http://schemas.android.com/tools"
    tools:context="com.example.bmi.MainActivity" >

<item
     android:id="@+id/action_settings"
     android:orderInCategory="100"
     android:title="@string/action_settings"
     android:showAsAction="never"/>

</menu>


menu標籤在加入item標籤,就可以定義每個選項與顯示的內容。
  • android:id = 指定選單項目的識別代號
  • android:title = 指定選項的名字。
  • android:orderInCategory = 指定選單間的排列順序,數字小的優先。若沒有指定這個屬性,則按照你定義item標籤的順序顯示。
  • android:showAsAction = 定義選單項目在ActionBar上的顯示方式。詳細資訊到Menu Resources看看。
將選單定義完成過後,要將定義好的選單加到Android應用程式上要用到onCreateOptionMenugetMenuInfalter.inflate().
@Override
 public boolean onCreateOptionsMenu(Menu menu) {
  getMenuInflater().inflate(R.menu.main, menu);
  return true;
 }

透過程式碼定義選單

除了可以透過XML定義選單,也可以透過程式碼來定義選單。新增一個選項要用到menu.add()


menu.add(groupId, itemId, order, title)
  • groupId = 指定選項屬於哪一個組別
  • itemId = 指定每一個選項一個唯一值,如果沒有指定就用Menu.NONE
  • order = 排列順序
  • title = 顯示選項的名字

 
@Override 
public boolean onCreateOptionsMenu(Menu menu) {
  menu.add(0,Menu.FIRST,100,R.string.about)
  return true;
 }

處理選單項目的功能
當選單設定好過後,這時候要處理每個選單項目的功能就需要加入onOptionsItemSelected函式。
 
@Override
public boolean onOptionsItemSelected(MenuItem item){
  // TODO Auto-generated method stub
  switch(item.getItemId()) {
     case R.id.action_about:
       openOptionsDialog();
       break;
     case R.id.action_close:
       finish();
       break;
   }
    return super.onOptionsItemSelected(item);
}

onOptionsItemSelected這個函式可以處理所有選項項目。函式中傳入一個MenuItem型別的item參數程式中的super.onOptionsItesSelected(item)表示要先執行已定義在Activity類別中原本的onOptionsItemSelected函式內容,後面才執行我們為此函式新定義的動作。

接著要在程式中對每個選項作處理 :
 
 switch(item.getItemId()) {
   case R.id.action_about:
       openOptionsDialog();
       break;
   case R.id.action_close:
       finish();
       break;
}
我們可以使用item.getItemId()函式,來取得在熒幕上選取的選單項目所對應的識別符號。然後在『switch』中,根據從item.getItemId()所取得的識別符號判斷程式應該運行的流程。R.id.action_aboutR.id.action_close是XML檔中定義的識別符號。 

2014年6月15日 星期日

Android 程式開發(四)

Android 程式開發(四)

在 Android程式開發 (三) 中已經將BMI程式所需要的UI Components都已經建立好。接下來將開始BMI的程式設計。以下是BMI完整的程式。

package com.example.bmi;

import java.text.DecimalFormat;
import android.os.Bundle;
import android.support.v7.app.ActionBarActivity;
import android.view.Menu;
import android.view.View;
import android.view.View.OnClickListener;
import android.widget.Button;
import android.widget.EditText;
import android.widget.TextView;

public class MainActivity extends Activity {

 @Override
 protected void onCreate(Bundle savedInstanceState) {
  super.onCreate(savedInstanceState);
  setContentView(R.layout.activity_main);
  
  initViews();
  setListener();  
 }
 
 private Button button_calc;
 private EditText num_height;
 private EditText num_weight;
 private TextView show_result;
 private TextView show_suggest;
 
 private void initViews(){
  button_calc = (Button)findViewById(R.id.submit); 
  num_height = (EditText)findViewById(R.id.height);
  num_weight = (EditText)findViewById(R.id.weight);
  show_result  = (TextView)findViewById(R.id.result);
  show_suggest  = (TextView)findViewById(R.id.suggest);
 }
 
 private void setListener(){
  button_calc.setOnClickListener(calcBMI);
 }

 
 private OnClickListener calcBMI = new OnClickListener(){
  public void onClick(View v){
     
    DecimalFormat nf = new DecimalFormat("0.00");
    double height = Double.parseDouble(num_height.getText().toString())/100;
    double weight = Double.parseDouble(num_weight.getText().toString());
    double BMI = weight/ (height*height);
     
    //Present result
    show_result.setText(getText(R.string.bmi_result)+nf.format(BMI));
       
    //Give advice 
    if(BMI > 25){
      show_suggest.setText(R.string.advice_heavy);
     } else if (BMI < 20){
      show_suggest.setText(R.string.advice_light);
     } else {
      show_suggest.setText(R.string.advice_average);
     }
  }
 };
 
 @Override
 public boolean onCreateOptionsMenu(Menu menu) {
  // Inflate the menu; this adds items to the action bar if it is present.
  getMenuInflater().inflate(R.menu.main, menu);
  return true;
 }
}


第15-16行
@Override
protected void onCreate(Bundle savedInstanceState) {
}
『onCreate』是這個方法的名稱,同時傳入一個Bundle類別的參數savedInstanceState。目前只需要知道savedInstanceState只是處理記憶體相關的事情就可以。因為我們的『MainActivity』類別繼承了Activity類別,所以『MainActivity』也要實作『onCreate』方法。事實『onCreate』方法是每個Activity類別在初始化時都會呼叫的方法。第15行中有『@』開頭的語句,那是裝飾子(decorator)的語句,『@Override』的作用是告訴程式我們要覆載『onCreate』這個方法。這時候當程式執行的時,將不再使用Activity類別裡的『onCreate』方法,而是使用『MainActivity』中自行實作的行為。接下來看看『onCreate』方法中的程式內容。

第17行
super.onCreate(savedInstanceState);
『super』是關鍵字,表示『MainActivity』的父類別(Activity)。程式的意思是呼叫Activity中的『onCreate』方法。Activity類別初始化的時候都會呼叫『onCreate』的方法。原本繼承『Activity』類別的『onCreate』方法,因為『@Override』的原因內容被重寫。因此想要將『Activity』類別的『onCreate』方法保留並加入我們的內容,就要使用『super』語句。

第18行
setContentView(R.layout.activity_main);
要將我們所定義好的畫面顯示在Activity當中要用『setContentView』,而在上一章節所定義好的UI components在activity_main.xml檔案中,只要透過『setContentView』參數設定為『R.layout.activity_main』引用XML文件描述檔就能將UI 顯示在Activity中。

第24-36行
private void initViews(){
  button_calc = (Button)findViewById(R.id.submit); 
     ...
 }
這段程式主要的功用是宣告Android介面上全部的UI components。透過Activity類別中內建的『findViewById』方法,可以根據識別代號從資源檔中取得對應的UI components實體。這邊以『R.id.submit』按鈕元件為例。我們可以在前面加上『Button』來強制將這個UI components 實體轉型為Button類別的實體。

『R.id.submit』對應到XML描述檔的資源。
  <Button android:id="@+id/submit"
  />
第39行
button_calc.setOnClickListener(calcBMI);
這句是包含『Button』類別中『setOnClickListener』方法。方法中傳入一個名叫『calcBMI』的函式。在Android系統的UI互動方式是採用事件驅動方式。也就是當使用者按下『button_calc』按鈕的時候,Android系統會去觸發『setOnClickListener』方法中所指定的函式『calcBMI』。

 private OnClickListener calcBMI = new OnClickListener(){
  public void onClick(View v){
    ....
   }
};
當使用者按下按鈕時,就會觸發『OnClickListener』類型的事件函式。此範例中的所有邏輯運算都放在這函式中。

BMI值運算,BMI的公式是(體重/身高(m)*身高(m))
double height = Double.parseDouble(num_height.getText().toString())/100;
double weight = Double.parseDouble(num_weight.getText().toString());
double BMI = weight/ (height*height);

透過『TextView』類別中的『setText』方法將結果輸出到手機畫面。
show_result.setText(getText(R.string.bmi_result)+nf.format(BMI));

顯示建議
if(BMI > 25){
   show_suggest.setText(R.string.advice_heavy);
} else if (BMI < 20){
   show_suggest.setText(R.string.advice_light);
} else {
   show_suggest.setText(R.string.advice_average);
}

2014年5月19日 星期一

Android 程式開發(三)

           Android 程式開發(三)

上一篇 Android程式開發(二)介紹了Android的UI Components。接下來將會以開發一個BMI程式為例子進行講解。在開始寫BMI程式之前,應該先設計interface。

介面設計

我們從Form Widgets當中選擇兩個TextView,兩個Large Text和一個Button。再來從Text Fields當中選擇兩個 Number (Decimal)。然後將這些UI Components擺放在自己喜歡的地方。TextView是用來顯示文字,Large Text是用來顯示結果,Button是用來計算BMI,Number(Decimal) 則是讓使用者輸入。


然後點擊第一個Edit Text按右鍵,選擇Edit ID,會彈出一個對話框讓我們輸入識別符號,我們在對話框中輸入 『height』當作這個這個UI Component的識別符號。


除了使用 Graphical Layout的方法設定ID,當然也可以使用XML檔進行編輯。現在我們將切換到 『activity_main.xml』將會看到以下的片段。

<TextView
        android:id="@+id/textView2"
        android:layout_width="wrap_content"
        android:layout_height="wrap_content"
        android:layout_alignParentTop="true"
        android:layout_centerHorizontal="true"
        android:layout_marginTop="16dp"
        android:text="身高 (cm)" />

『android:text』是用來顯示文字,而『android:id』和給UI Components的識別符號,每一個介面元件都要有一個ID,主要的用處是為了讓程式可以找到相關的UI Components。以下是完整的activity_main.xml的描述

  <RelativeLayout xmlns:android="http://schemas.android.com/apk/res/android"
    xmlns:tools="http://schemas.android.com/tools"
    android:layout_width="match_parent"
    android:layout_height="match_parent"
    android:paddingBottom="@dimen/activity_vertical_margin"
    android:paddingLeft="@dimen/activity_horizontal_margin"
    android:paddingRight="@dimen/activity_horizontal_margin"
    android:paddingTop="@dimen/activity_vertical_margin"
    tools:context="com.example.bmi.MainActivity$PlaceholderFragment" />

<EditText
        android:id="@+id/weight"
        android:layout_width="wrap_content"
        android:layout_height="wrap_content"
        android:layout_below="@+id/textView1"
        android:layout_centerHorizontal="true"
        android:ems="10"
        android:inputType="numberDecimal" >
    </EditText>

    <Button
        android:id="@+id/submit"
        android:layout_width="wrap_content"
        android:layout_height="wrap_content"
        android:layout_below="@+id/weight"
        android:layout_centerHorizontal="true"
        android:layout_marginTop="26dp"
        android:text="計算 BMI 值" />

    <TextView
        android:id="@+id/suggest"
        android:layout_width="wrap_content"
        android:layout_height="wrap_content"
        android:layout_alignLeft="@+id/result"
        android:layout_below="@+id/result"
        android:layout_marginTop="14dp"
        android:textAppearance="?android:attr/textAppearanceLarge" />

    <TextView
        android:id="@+id/result"
        android:layout_width="wrap_content"
        android:layout_height="wrap_content"
        android:layout_below="@+id/submit"
        android:layout_centerHorizontal="true"
        android:layout_marginTop="19dp"
        android:textAppearance="?android:attr/textAppearanceLarge" />

    <EditText
        android:id="@+id/height"
        android:layout_width="wrap_content"
        android:layout_height="wrap_content"
        android:layout_below="@+id/textView2"
        android:layout_centerHorizontal="true"
        android:ems="10"
        android:inputType="numberDecimal" />

    <TextView
        android:id="@+id/textView2"
        android:layout_width="wrap_content"
        android:layout_height="wrap_content"
        android:layout_alignParentTop="true"
        android:layout_centerHorizontal="true"
        android:layout_marginTop="16dp"
        android:text="身高 (cm)" />

    <TextView
        android:id="@+id/textView1"
        android:layout_width="wrap_content"
        android:layout_height="wrap_content"
        android:layout_alignRight="@+id/textView2"
        android:layout_below="@+id/height"
        android:text="體重 (kg)" />

</RelativeLayout>

將字串抽離XML介面描述檔

為了更好的維護介面,我們可以將『activity_main.xml』檔中的字串抽離。我們可以在 『res』->『values』->『string.xml』中定義我們所需要的字串如下。

    <string name="app_name">BMI</string>
    <string name="hello_world">Hello world!</string>
    <string name="bmi_height">身高 (cm)</string>
    <string name="bmi_weight">體重 (kg)</string>
    <string name="bmi_btn">計算  BMI 值</string>
    <string name="bmi_result">你的BMI值是 </string>
    <!-- advise -->
    <string name="advice_light">你該多吃點</string>
    <string name="advice_average">體型很棒</string>
    <string name="advice_heavy">你該節食</string>
    <!-- other -->
    <string name="action_settings">Settings</string>

定義完成後,要使用所定義的文字我們要使用"@string/"。可以在『Graphical Layout』中選擇『身高(cm)』然後按F2後輸入 @string/bmi_height 。有沒有注意畫面的感嘆號已經消失了。其他在介面所顯示的文字採用一樣的方法進行更換。

2014年4月8日 星期二

Android 程式開發(二)

Android 程式開發(二)


上一篇Android程式開發(一)介紹開發Android程式的工具和前置工作,接下來將討論Android的介面元件 (UI Components)。

在開發Android程式之前,一定要先弄清楚Android有提供那些UI components讓我們使用才能更好的開發Android程式。

Android UI Components

Android提供非常豐富和多樣化的UI components,開啟專案中的『res/layout/activity_main.xml』可以看到預覽畫面和包含Hello World的字串。在左下角有兩個標籤『Graphical Layout』和『activity_main.xml』。在『Graphical Layout』我們可以直接將UI components以drag and drop(拖、拉)的方式進行設定,而 『activity_main.xml』是採用XML檔案描述手機畫面,可以透過修改XML檔進而設計手機畫面。


UI components 根據GraphicalLayout上的分類,共有以下幾種

  • Form Widgets
  • Text Fields
  • Layouts
  • Composite
  • Images and Media
  • Time and Date
  • Transitions
  • Advanced
Android Form UI Components:

名稱 作用
TextView 顯示文字
Button 按鈕
Spinner 下拉選單
CheckBox 勾選鈕

Android Layout Components:


名稱 作用
Linear Layout 線性版面
Relative Layout 相對版面
FrameLayout 框架版面
TableLayout 表格版面

Android DatePicker Components:

名稱 作用
TimePicker 選取時間
DatePicker 選取日期
CalendarView 日曆檢視
AnalogClock 類比時鐘

更詳細的UI components到官網觀看Android UI Components

我們從預覽換面看到『Hello World!』,現在要把它改成『Hello, Android Program』。剛才提到有『Graphical Layout』和『activity_main.xml』描述手機畫面。透過『Graphical Layout』修改,只要點擊畫面中的『Hello World!』然後按 "F2" 就能直接修改文字。透過『activity_main.xml』我們看到如下的XML檔案:
        
<TextView
        android:layout_width="wrap_content"
        android:layout_height="wrap_content"
        android:text="@string/hello_world" ?>
我們只需要將『android:text="@string/hello_world"』改成 『android:text="Hello,Android Program"』就能將文字內容改變了。

Android 程式開發(一)

Android 程式開發(一)

Android 是什麼?
Android 簡單來說就是一個手持式設備(主要是手機)的作業系統平台。

安裝 Android 開發工具
Android的安裝流程可以分為以下兩個步驟 :
  1. 下載並安裝Java
  2. 到Android官網下載Eclipse (已經整合了Android 的套件) 或 Android Studio.(我是採用Eclipse)

Android程式執行前置工作
執行Android程式有兩種方法:
  1. 在Eclipse當中建立一個Android的虛擬機器
  2. 有一台Android 平台的手機 (廢話....)
     建立一個Android的虛擬機器
  1. 在Eclipse上方點選Android Virtual Device Manager                                                                                                  
  2. 點選過後會彈出一個表格然後點選New,接下來輸入虛擬器的名稱,你要的設備,CPU,Memory等等

  3. 設定完成後,就可以執行Android程式了。
     P.S. 個人而言不建議這種做法,因為每次執行虛擬機器的時候都需要等很久,當需要debug
     時真的很浪費時間尤其只有小錯誤的時候(其實是我沒耐心)。所以說既然要寫Android程式
     那不如買一台Android手機吧

     有一台Android手機
     如果你有一台Android手機那就太好了,不管在執行Android程式或者debug的時候都會很方  
     便。
     1. 首先要開啟手機的開發人員選項,然後對USB偵錯模式打勾。(Android 4.2 以上的使用者            官方因為安全因素將開發人員選項隱藏。開啟方法是設定->關於手機->不斷點選"軟體版
         本", 這樣就能開啟開發人員選項了)

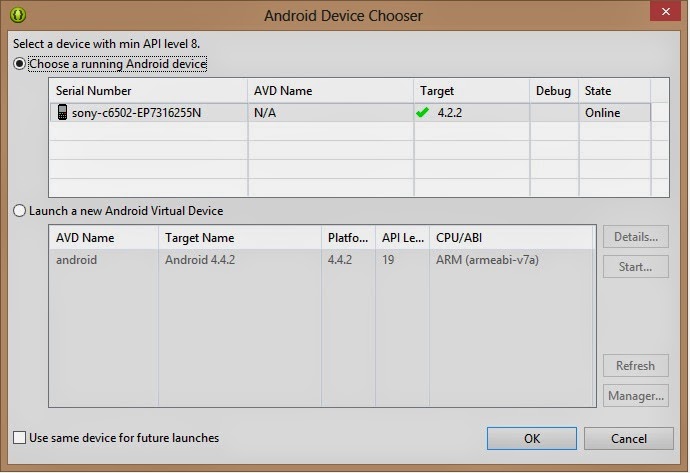
     2.當你執行程式的時候會出現以下的圖,然後選擇 "Choose a running Android device" 就能將
        你所寫的程式在手機執行。


接下來將會討論關於Android手機的介面元件(User Interface Components)


2014年3月4日 星期二

UVa Problem 12403 - Save Setu

UVa Problem 12403 - Save Setu

Time limit: 1.000 seconds

https://uva.onlinejudge.org/index.php?option=com_onlinejudge&Itemid=8&category=16&page=show_problem&problem=3834

Rahaduzzaman Setu, (Roll - 12) of 13th batch, CSE, University of Dhaka is tremendously ill. He has been suffering from Multi Drug Resistant TB for a long time. Now, his left lung is damaged and beyond repair. No medicine is working on his body to ease his pain. It is urgent to operate on his left lung so that the disease doesn’t spread to his right lung. It can either be removed through surgery or transplanted. He comes from a modest family and it is difficult and impossible for them to bare his medical expenses anymore. Because of the money needed (12 million BDT) to transplant, it is his family’s decision to go with the surgery (3 million BDT). We must help them financially by raising money. But we must not be confined with that amount only to do the surgery. We must go for the Transplant. Our target will be to collect as much as possible to help our friend. If anyone wants to contribute now, please send me your contribution or contact me. Please contribute as much as you can to save a life that you saw every week for the first two years of your University life. Please contribute as per your abilities. Our combined effort may save a life. For more information, consult the link below. 

http://supportsetu.com/ 

However, in this problem, you have to build a software that can calculate the donations. Initially the total amount of money is 0 and in each time, two types of operations will be there. 1) ‘donate K’ (100 ≤ K ≤ 105 ), then you have to add K to the account. 2) ‘report’, report all the money currently in the account. 

Input 
The first line of input will contain T (1 ≤ T ≤ 100) denoting the number of operations. Then there will be T lines each containing two types of operations as given. You may assume that the input follows the restrictions above. 

Output 
For each ‘report’ operation, print the total amount of money in the account. 

Sample Input 
donate 
1000 
report 
donate 
500 
report 

Sample Output 
1000 
1500

解題方法: 當 operation 是 donate 將輸字加總, report 就將將總的數字print 出來

import java.util.Scanner;

class UvA12403 {

  public static void main(String[] args) 
  {
      
   Scanner scan = new Scanner(System.in);
   int donations = 0 ;
   
   int n = scan.nextInt(); //insert the numbers of operations
   
   for(int i = 0 ; i < n ; i ++)
   {
    String operations = scan.next();  
    if(operations.equals("donate"))
     donations += scan.nextInt();
    else
     System.out.println(donations);
   } 
 }

}

UVa Problem 621 - Secret Research

UVa Problem 621 - Secret Research

Time limit: 3.000 seconds


At a certain laboratory results of secret research are thoroughly encrypted. A result of a single experiment is stored as an information of its completion: ‘positive result’, ‘negative result’, ‘experiment failed’ or ‘experiment not completed’ The encrypted result constitutes a string of digits S, which may take one of the following forms: 
  •  positive result S = 1 or S = 4 or S = 78 
  •  negative result S = S35 
  •  experiment failed S = 9S4 
  •  experiment not completed S = 190S 
(A sample result S35 means that if we add digits 35 from the right hand side to a digit sequence then we shall get the digit sequence corresponding to a failed experiment) You are to write a program which decrypts given sequences of digits.

Input 
A integer n stating the number of encrypted results and then consecutive n lines, each containing a sequence of digits given as ASCII strings. 

Output 
For each analysed sequence of digits the following lines should be sent to output (in separate lines): + for a positive result - for a negative result * for a failed experiment ? for a not completed experiment


Sample Input 
78 
7835 
19078 
944 

Sample Output 
+
 - 
*

解題方法 : 這題也是非常簡單,只需要根據題目所給的條件實作即可

import java.util.Scanner;
class UvA621 {

 public static void main(String[] args) {
  
  Scanner scan = new Scanner(System.in);

  int n = scan.nextInt();
  
  for(int i = 0 ; i < n ; i++ )
  {
   String encryptedMessage = scan.next();
   if(encryptedMessage.equals("1") || encryptedMessage.equals("4") || encryptedMessage.equals("78"))
    System.out.println("+");
   else
   {
    if (encryptedMessage.endsWith("35"))
     System.out.println("-");
    else if (encryptedMessage.startsWith("9") && encryptedMessage.endsWith("4"))
     System.out.println("*");
    else if (encryptedMessage.startsWith("190") )
     System.out.println("?");
   }
   
   
  }
 
 }

}